How to Connect Two Monitors to a Laptop
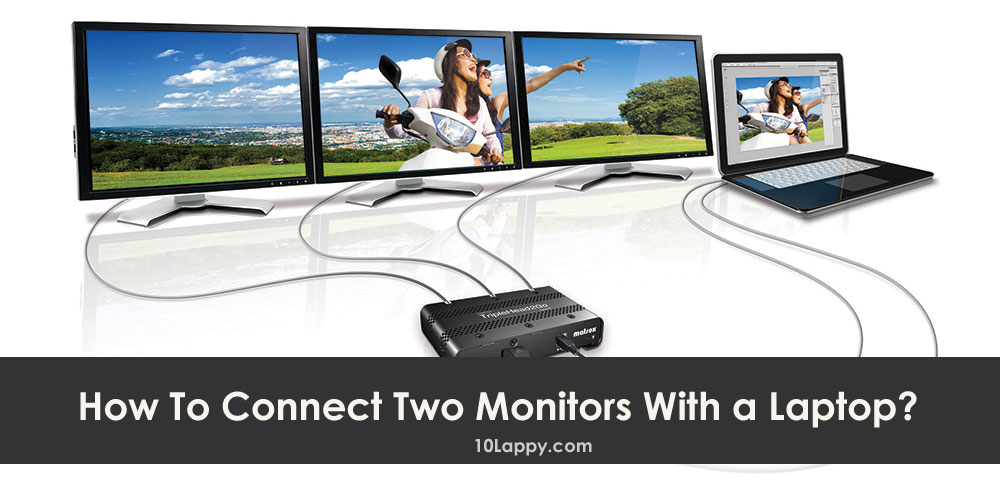
Two monitors turn a cramped laptop screen into a proper workspace: your document on one display, your research, inbox or chat on the other, and no more shuffling windows every few seconds. The good news is that almost every modern laptop can drive two external monitors. The catch is that the right way to connect them depends on the ports your laptop has and on how many displays its graphics hardware can run at once. Connect them the wrong way, or with the wrong accessory, and you can end up with two screens showing the same picture instead of one wide desktop.
This guide walks through all four working methods, from the simple two cable setup to docking stations, DisplayPort daisy chaining and DisplayLink adapters for laptops with strict display limits. It then covers the Windows 11 and Windows 10 settings that turn two connected screens into one extended desktop, and the fixes for the three problems people hit most often.
Quick Answer: If your laptop has two video outputs, connect one monitor to each and press Windows key + P, then choose Extend. If it has a single USB-C or Thunderbolt port, use a docking station with two display outputs and connect both monitors to the dock. If your monitors have DisplayPort In and DisplayPort Out ports, you can daisy chain the second monitor from the first. On a MacBook or laptop limited to one external display, a DisplayLink dock is the workaround that adds a second extended screen.
The Four Connection Methods at a Glance
| Method | What You Need | Extends or Mirrors | Best For |
|---|---|---|---|
| Two cables, direct | A laptop with two video outputs and one cable per monitor | Extends | The simplest setup when the ports are there |
| Docking station | A USB-C or Thunderbolt dock with two display outputs | Extends | One cable to the laptop, plus charging and USB ports |
| Daisy chain (DisplayPort MST) | Monitors with DisplayPort In and Out, and a DisplayPort 1.2 or newer output | Extends | Fewer cables when the monitors support chaining |
| DisplayLink dock or adapter | A DisplayLink dock and its free driver software | Extends | MacBooks and laptops limited to one native display |
| HDMI splitter | One HDMI output and a splitter box | Mirrors only | Showing the same picture on two screens, never a wider desktop |
First, Check What Your Laptop Supports
Five minutes of checking here saves the most common disappointment in this whole project: buying cables or a dock and then discovering the laptop itself is the limit. Three things decide what is possible.
Count your video outputs. Look at the sides of the laptop and count the ports that can send a picture out: HDMI, DisplayPort or Mini DisplayPort, and USB-C. Two separate video outputs usually means two monitors can connect directly. One output does not rule out two monitors, because docks and daisy chaining exist, but it changes which method you need.
Check whether your USB-C port carries video at all. A USB-C shaped port only sends a display signal if it supports DisplayPort Alt Mode or Thunderbolt. Look for a small DisplayPort symbol or a lightning bolt Thunderbolt symbol printed next to the port. A plain USB-C port with neither mark may be data and charging only, and no adapter will turn it into a video output. If there is no symbol, find your exact model on the manufacturer support site and read the port description in the specifications.
Check the display limit in the spec sheet. Every laptop has a maximum number of displays its graphics hardware can run at the same time, and the built-in screen counts as one of them. Manufacturers state this in the specifications, usually as a line about supporting one or two external displays at a given resolution. Integrated Intel and AMD graphics in recent laptops typically handle the internal screen plus two externals, but slim models and older machines sometimes stop at one external. This number is a hard ceiling: no dock, hub or cable can raise it, because the limit sits in the graphics hardware itself. The one exception is DisplayLink, covered in Method 4, which works precisely because it does not use the normal display outputs.
One more expectation to set early: every port on a laptop is an output. The HDMI port sends your picture to a monitor; it cannot accept a picture from another device. If your actual goal is the reverse, showing a game console or another computer on your laptop screen, that needs a capture device rather than a cable, and our guide on how to change HDMI output to input on a laptop explains what is and is not possible. The same capture route is how you would connect a Nintendo Switch to a laptop, for example. The same setup also lets you use your laptop as a monitor for a PS4. For two monitors showing your laptop’s own desktop, though, read on.

Method 1: Connect Both Monitors Directly With Two Cables
If your laptop has two video outputs, this is the cheapest and most reliable method, because each monitor gets its own full connection. Common combinations are HDMI plus USB-C, HDMI plus Mini DisplayPort, or two USB-C ports.
Connect the first monitor to the first output with a cable that matches both ends, for example HDMI to HDMI. Connect the second monitor to the second output; if that output is USB-C with DisplayPort Alt Mode or Thunderbolt, use a USB-C to HDMI or USB-C to DisplayPort cable, or a simple adapter with a normal cable. Switch both monitors on and set each one to the input you used, using the monitor’s own buttons if it does not switch automatically.
That is the whole physical setup. Windows normally detects both screens the moment they are connected, and the setup steps further down turn them into one extended desktop. Direct connections have no shared bandwidth compromises, so this method also gives the most predictable resolution and refresh rate results: each screen gets whatever its own port and cable can carry.
Method 2: Use a Docking Station for a One Cable Setup
A docking station is the neatest answer when your laptop has a single USB-C or Thunderbolt port, or when you want to plug in one cable at your desk and have everything connect at once. The dock sits on the desk with both monitors, your keyboard, mouse and network cable attached to it, and a single cable runs from the dock to the laptop.
Thunderbolt docks are the strongest version of this idea. A Thunderbolt connection carries two separate DisplayPort video streams, so a Thunderbolt dock can run two full monitors natively, at up to 4K resolution at 60Hz each, straight from the laptop’s graphics hardware. USB-C docks without Thunderbolt use DisplayPort Alt Mode instead; good ones still drive two monitors, but some cheaper hubs share bandwidth in a way that drops one screen to a lower resolution or a 30Hz refresh rate, which feels visibly sluggish. If you are buying a dock for two 4K screens, check that its specifications promise dual 4K at 60Hz rather than just dual displays.
Most docks also charge the laptop through the same single cable, using USB Power Delivery. Check the wattage the dock passes through against the wattage of the charger your laptop came with. A dock that delivers less power than the laptop expects may charge it slowly, or only while the laptop is idle or asleep.
A dock is still bound by the display limit described earlier. It gives your laptop’s existing display outputs a more convenient shape; it does not create new ones. That is why a dock cannot fix the one display limit on the MacBooks described in Method 4, and why checking your laptop’s own specification comes first.
Method 3: Daisy Chain the Monitors With DisplayPort MST
Daisy chaining connects the monitors to each other instead of running every cable back to the laptop. It works through a DisplayPort feature called Multi-Stream Transport, or MST, which has been part of the DisplayPort standard since version 1.2. MST lets one DisplayPort output carry several independent display signals at once, and each monitor in the chain shows its own picture.
The requirements are specific. Your laptop or dock needs a DisplayPort 1.2 or newer output, or a USB-C or Thunderbolt port feeding the chain. The first monitor must have both a DisplayPort In and a DisplayPort Out port, and MST support; the last monitor in the chain only needs a DisplayPort In. Most business class monitors offer this, while many basic home monitors do not have a DisplayPort Out at all, so check the port list before planning around this method.
To set it up, connect the laptop to the first monitor’s DisplayPort In. Then run a second DisplayPort cable from the first monitor’s DisplayPort Out to the second monitor’s DisplayPort In. Open the first monitor’s on-screen menu and switch its MST setting on; on the last monitor in the chain, MST stays off. Dell’s support documentation describes exactly this sequence, and other brands follow the same pattern.
All the monitors in a chain share the bandwidth of that single connection, and that is the real limit of this method. A DisplayPort 1.2 chain can carry up to four 1080p monitors at 60Hz, or two monitors at 2560 x 1600, but only one 4K monitor at 60Hz. For two 4K monitors in a chain you need DisplayPort 1.4 class bandwidth, or a Thunderbolt connection. Two 1080p or 1440p office monitors, which is what most people chain, sit comfortably inside the budget.
One platform warning: daisy chaining for extended desktops is a Windows feature in practice. macOS does not support MST for separate extended displays, so on a Mac a chain of monitors shows the same mirrored image rather than individual desktops. Mac users should use separate ports or a Thunderbolt dock instead, within the display limits Apple sets for their model.
Method 4: Use DisplayLink for Laptops and Macs With a One Display Limit
Some laptops can only ever show one external display through their normal ports, and the most common examples are MacBooks. Apple’s own specifications state that MacBook models with the base M1 or M2 chip support one external display, and base M3 models support a second external display only with the laptop lid closed. Newer base M4 models and the Pro and Max chips support two or more with the lid open, and Intel MacBooks vary by model, so the specification page for your exact machine is the deciding document. When the limit is one, no Thunderbolt dock or extra adapter changes it, because the limit is in the chip.
DisplayLink is the workaround, and it works differently from everything above. A DisplayLink dock or adapter contains its own graphics chip. Free driver software on the laptop renders the extra screen, compresses it, and sends it over an ordinary USB connection as data; the chip in the dock turns it back into a normal monitor signal. Because the picture never passes through the laptop’s display outputs, it sidesteps the hardware display limit entirely. The same trick helps Windows laptops that have run out of video outputs.
Setting it up means installing the DisplayLink driver before or right after connecting the dock. On Windows the driver often arrives through Windows Update; on a Mac you install the DisplayLink Manager app from the DisplayLink website and allow it the Screen Recording permission macOS asks for, which the app needs in order to capture the pixels it sends to the extra screen.
Be clear about the trade-offs, because DisplayLink is a workaround rather than a perfect substitute. The compression uses some of your processor’s capacity, fast moving content such as games and action video looks less smooth than on a natively connected screen, and copy protected streaming video may refuse to play on a DisplayLink screen. For documents, spreadsheets, coding, browsing and video calls, which is what most second monitors are for, it works well and is the only route to two extended screens on a one display MacBook. If smooth console play is the priority, the capture and Remote Play route for playing a PS4 on a laptop over HDMI is a better fit than a DisplayLink screen.
Set Up the Two Monitors in Windows 11 and Windows 10
However you connected the screens, the last job is telling Windows how to use them. The steps below are for Windows 11; Windows 10 uses the same Display settings page with the same wording, so the sequence is identical. Windows 10 stopped receiving regular support in October 2025, but its display settings still work exactly as described.
- Connect both monitors and switch them on.
- Right-click an empty area of the desktop and choose Display settings. You will land in Settings, under System and then Display, where each detected screen appears as a numbered box.
- If a monitor is missing, scroll to the Multiple displays section and click Detect. If it still does not appear, work through the troubleshooting section below before continuing.
- Click Identify. A large number flashes on each physical screen so you can match it to its numbered box.
- Drag the numbered boxes so they sit in the same positions as the real monitors on your desk, side by side, stacked, or offset, then click Apply. This arrangement decides where your mouse pointer crosses from one screen to the other.
- Open the drop-down next to Identify in Windows 11, or the Multiple displays drop-down in Windows 10, and choose Extend these displays, then click Keep changes when Windows asks. You can also press Windows key + P at any time and pick Extend from the panel that appears; the other choices there are PC screen only, Duplicate, and Second screen only.
- Click the box for the monitor you use most, scroll to Multiple displays, and tick Make this my main display. The main display is where the taskbar clock, notifications and most new windows appear by default.
- Click each display in turn and set its Display resolution to the value marked Recommended, which is the monitor’s native resolution. If text looks too small or too large on one screen, adjust its Scale setting under Scale and layout rather than lowering the resolution.
- For a gaming or high refresh monitor, open Advanced display settings, select that monitor, and set its refresh rate to the highest value the monitor supports, because Windows often leaves it at 60Hz.
The same Extend setting is what you want when the second screen is a projector rather than a monitor, since Windows treats both identically; our separate guide covers the connection side of how to connect a laptop to a projector with USB.
Troubleshooting: The Three Problems Everyone Hits
The second monitor is not detected
Start with the basics, in this order. Confirm the monitor is on and set to the input its cable uses, because a screen sitting on the wrong input looks exactly like a dead connection. Reseat the cable at both ends, then try the Detect button in Display settings. Swap the cable for a known good one, since faulty and underrated cables cause a large share of these failures. If the connection runs through USB-C, confirm the port actually supports video, as described in the checking section; a data only USB-C port will never produce a picture. Finally, update your graphics driver from the laptop or GPU maker’s site, and restart the laptop with the monitors connected and switched on.
The resolution or refresh rate is wrong
If a 4K monitor only offers low resolutions, or a fast monitor is stuck at 30Hz or 60Hz, the bottleneck is almost always bandwidth somewhere in the chain. Check that you are using the cable the monitor shipped with, or one rated for the resolution you want; older HDMI cables and cables bundled with cheap hubs are frequent culprits. If the screens run through a hub, dock or daisy chain, remember that the bandwidth is shared, and lower one screen’s resolution or refresh rate to see whether the other improves, which confirms sharing as the cause. Set each screen individually in Display settings, because Windows stores resolution and refresh rate per monitor, and confirm the refresh rate under Advanced display settings rather than assuming it followed the resolution.
Both monitors show the same picture
Mirroring instead of extending has three usual causes. The first is simply the display mode: press Windows key + P and choose Extend, because Duplicate is sometimes selected by default. The second is an HDMI splitter: a splitter copies one signal to two screens and physically cannot produce two different desktops, so if your setup includes one, replace it with one of the four methods in the table at the top. The third is a daisy chain or MST hub connected to a Mac, where the chain mirrors because macOS does not support MST extended desktops; the fix there is separate connections or a DisplayLink dock, within the limits described in Method 4.
Frequently Asked Questions
Can I connect two monitors to a laptop with only one HDMI port?
Yes, but not with a second HDMI cable and not with a splitter, which only mirrors. Your options are a docking station connected to a USB-C or Thunderbolt port, a daisy chain if your monitors have DisplayPort Out ports, or a DisplayLink adapter that adds an extended display over USB. Check first whether the laptop has a USB-C port with video support, because most laptops with one HDMI port have one, and it opens up the dock route.
Why do both of my monitors show the same thing?
Because the setup is mirroring. Either Windows is set to Duplicate, which Windows key + P and Extend will fix, or the hardware itself can only mirror: an HDMI splitter always mirrors, and a DisplayPort daisy chain connected to a Mac mirrors because macOS does not support MST for extended desktops. Once the connection method can carry two separate signals and Windows is set to Extend, each screen shows its own content.
Can I connect two monitors through one USB-C port?
Yes, in three ways. A Thunderbolt port can feed a dock that outputs to two monitors natively, a USB-C port with DisplayPort Alt Mode can start an MST daisy chain or feed an MST dock, and a DisplayLink dock can add displays over USB data from almost any USB-C port. What a single USB-C port cannot do is help if the port has no video support and the laptop’s display limit is already reached without DisplayLink.
How many external monitors can a MacBook support?
It depends entirely on the chip, and Apple’s specification pages give the exact answer per model. Base M1 and M2 MacBooks support one external display. Base M3 models support two external displays only with the lid closed. Base M4 models and all Pro and Max chips support two or more with the lid open. A dock or hub does not raise these numbers; DisplayLink is the supported way around them.
Do I need a docking station to use two monitors?
No. A dock is only one of four methods, and it is the right choice mainly when your laptop lacks enough video outputs or you want a one cable desk setup. If your laptop already has two video outputs, two cables do the same job for the price of the second cable. Buy a dock for convenience, ports and charging, not because two monitors require one.
The Verdict
Connecting two monitors to a laptop is mostly a matching exercise: match the method to the ports and display limit your laptop actually has. Two video outputs means two cables and five minutes in Display settings. One USB-C or Thunderbolt port means a docking station, ideally a Thunderbolt model for two full resolution screens. Monitors with DisplayPort Out ports can daisy chain and keep the desk tidy, as long as the shared bandwidth covers your resolutions. And when the laptop itself is capped at one display, as many MacBooks are, DisplayLink is the honest workaround that gets you a genuine second desktop. Whichever route you choose, finish in Display settings with Extend selected and the screens arranged to match your desk, and the setup will feel like one wide workspace rather than two separate screens.