You want to take picture of your laptop’s screen. The only problem is that it is rather a tricky process but you do not have to worry because we are here to help you. In this article, we will tell you how to take screenshot on laptop.
Before we start the article there is something we would like to tell you and that is there are different laptops where you can take screenshots by different methods.
The windows system plays a huge role while you are taking screenshots and in our article, we are going to tackle this problem too. So without any time-wasting let us start the article.
Taking screenshots on windows 10
Nowadays windows 10 is the most popular window used by every other person. Microsoft has made a lot of improvements in the windows os. There are a lot of ways that you can take screenshots on windows 10. You can take a screenshot of the full screen or you can save a certain portion of the screen and we will tell you about that.

Here are four ways to take a screenshot on a laptop
1. Press PrtScn
This is the first and most common method on our list. This button on your laptop allows you to take a screenshot at a moment. This method auto-saves the screenshot and you can use it wherever you want.
We have reviewed: 7 Best Laptops For Biology Majors
2. Press Alt + PrtScn
This shortcut allows you to copy the active window into the clipboard and from there you can paste it anywhere.
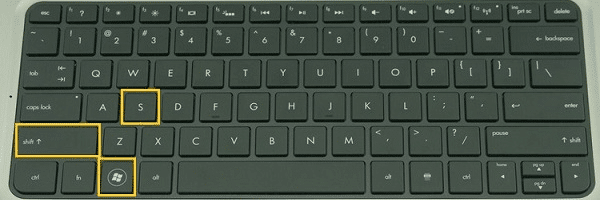
3. Press Windows key + Shift + S
In this process, your screen will dim and you will see a cursor on your laptop which will allow you to select the area that you want to save as a screenshot. You can select the whole screen or a part of the screen. It depends on you. This feature is only limited to the latest version of Windows 10.
These are some shortcuts that will help you to take screenshots on windows but there is one built-in tool that you can use in windows to take screenshots.
4. Snipping tool
You can use this tool to directly take screenshots and save them. This tool is useful as you can pin it to the taskbar. Let us tell you how to use the snipping tool.
- Go to the start menu and launch the snipping tool.
- You will see a mode menu where you can select the shape of the screenshot of the full-screen option with free to crop anywhere available.
- Now you have the option to take a screenshot. The screen will freeze after that you can use your cursor to take a screenshot of your laptop’s screen. After you are done taking this screenshot it will appear in full form and you can save it however you want to.
- If you want to crop the screenshot you can do that however you want to with the crop tool located in the options.
- You also can save the picture to the clipboard by clicking the copy button in the menu.
Read Also: How To Use Your Laptop As A Monitor For PS4?
As we have discussed all of these options now I would like to let you know about how you can take screenshots on certain laptops. These laptops are available around the world and many people use that so we have made some points that will help you to take screenshots on your laptop.
How to take a screenshot on an hp laptop
The simplest and most easy way to take screenshots with hp laptops is by using “Prt Sc” you can use this key to take screenshots quickly. Many ways allow you to customize your screenshots-taking experience.
You can find this “Prt Sc” button on your hp laptop near the delete key or it can be found at the bottom of the keyboard near the “Alt key” although these things depend on the model of your laptop most probably you will find “Prt Sc” on these two places.
You can also use the alternative method which is windows+Shift+S to take screenshots on your hp laptop.
How to take a screenshot on a Dell laptop
As we have talked about the screenshot process on hp laptops some people own Dell laptops as it is the most common and famous company for laptops.
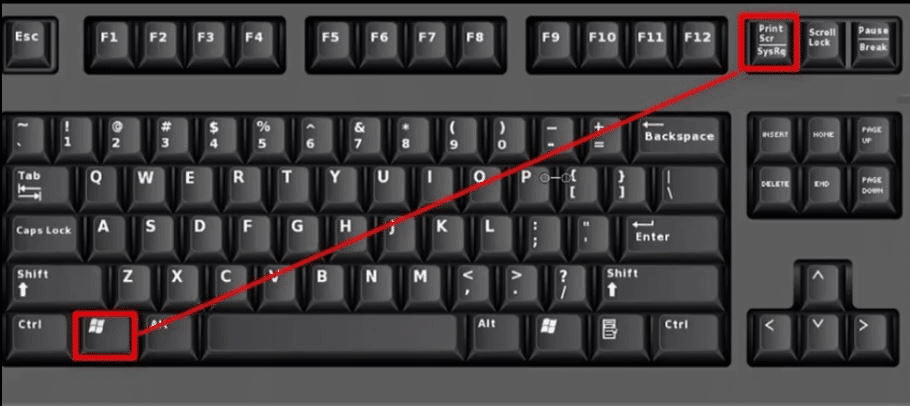
You just have to press the windows key logo which is available in the bottom left corner. When you press the windows key logo you are supposed to Prntscrn key with that and you will have a screenshot of your whole screen.
The whole method is as follows Windows key + PrntScrn key.
Read our review on the best laptops for outdoor use
How to take screenshots on Asus laptops
Asus laptops have been around the corner for a long time. These laptops are famous for their good performance taking a screenshot is not a big deal when you are using an Asus laptop. This method is similar to the method we use on a Dell laptop to take a screenshot.

You just have to locate the windows key button on your laptop and press the PrntSc key after that to take a screenshot. It does not matter if you are using windows 7, 8, or 10. This method will work on every Asus laptop.
How to take a screenshot on a Toshiba laptop windows 10
Toshiba’s laptops are not very common so many people do not know how to take screenshots on these laptops.
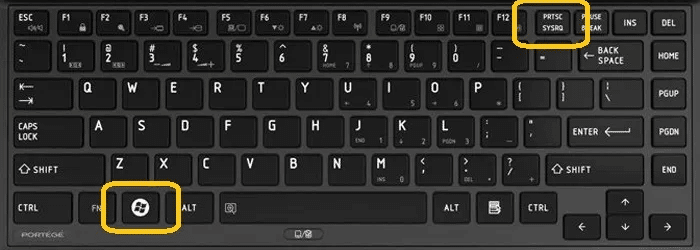
You can press the Windows key plus SysRq to take a screenshot on your Toshiba laptop windows 10 or you can press Ctrl plus SysRq key to take a screenshot on your Toshiba windows 10 laptop.
The simple shortcuts will be like these
Windows key + SysRq
Ctrl + SysRq