ASUS has a number of well-known laptops, Chromebooks, Zen books, Tablets with high resolution, using the latest graphics technology and operating systems. ASUS deals with thin slim light weighted and both in touch/non-touch use Nano edge displays.

The best thing is that laptops are available in different generations and categories. ASUS made its name by itself by providing good quality products and several options for their clients.
While manufacturing uses high quality of aesthetic, They always monitor the quality of material used in manufacturing. While design they prefer the latest or unique designs. Asus brand provides one year warranty to their customers only in case of natural disasters or accidents.
Like different laptops, Asus also has a different method to access the BIOS menu. There may be key combinations of just a single key involved in it. We are going to discuss all that in this article.
How To Access Bios On Asus Laptop?
The process is quite easy and simple to access BIOS but many people do not know how to do it. Different Windows and different brands have different methods to access the BIOS menu.
Step to follow:

In the case of the Asus laptops, first press the “shift key” or when you turn on the laptop press the “F2” key and hold until it till you see the BIOS display. Doing this will see the BIOS menu instead of the Asus logo.
Here you see many panels like the Main menu, Advanced boot, Security, and Save & Exit. To access these panels you use left and right keys. These keys are on your keyboard beside the number pad. After selecting the desirable panel you must press enter to access it.
Here you enable/disable what you want. If you want to go back use the Esc key. After changing in any panel you must go to save changes and press enter. By doing this you save all the changes on your system.
Read Also: How to reboot a Laptop properly?
Keys To Navigate in BIOS Menu
- For selecting different options use the left and right keys “Left/Right key”.
- For changing some options such as if you want to disable any option which is enabled use the “Enter key”.
- If you want to go back, use the “Esc key”.
How to Exit from Bios on Asus laptop?
There is a specific way to exit the BIOS setup after saving the changes you have done. Otherwise, you will be lost all the changes and bios will be at default again.
So, we access Bios for solving the problem from which our laptop is suffering. After resolving the problem a person should know how to exit from here and use a laptop. Exiting from bios requires pressing F10 or navigating to “Save and Exit”.
Other Ways To Access Bios Setup On Asus Laptop
There are different methods to access bios on different laptops depending upon the laptop model and installed Windows type.
| Type | Model | Bios keys |
| Asus laptop | X202E, X550CA, U38N | Delete key |
| Asus laptop | N550JV, G750JX | F2 key |
| Asus netbook | Eee Pc 1015, 1025C | F2 key |
Why do we need to access bios?
There are a lot of problems faced by many people while they are working on their system. Some of the hardware problems can also be resolved through the BIOS menu. You can change the drive (Storage) settings, Boot menu options, Enable/Disable any hardware, and many other important features.
Updated BIOS will work more proficiently than the older version. To update the BIOS, you have to change some of the settings that require access to the BIOS menu. In short, accessing the BIOS is one of the necessary parts for several laptops’ functions.
There are several problems that require the in-BIOS solution. One of them is repeating the BIOS screen after turning on the laptop. This can be eliminated using the following method.
Check Also: 6 Best Mini Laptops under $200
How to Disable BIOS Repeating Screen?
Bios come repeatedly when you turn on or off a system and may become a problem. To solve this problem follow these steps:
Step 1
Access the BIOS and then go to the menu panel and move to the menu by using the left and right keys you see on the keyboard beside the number pad,
Step 2
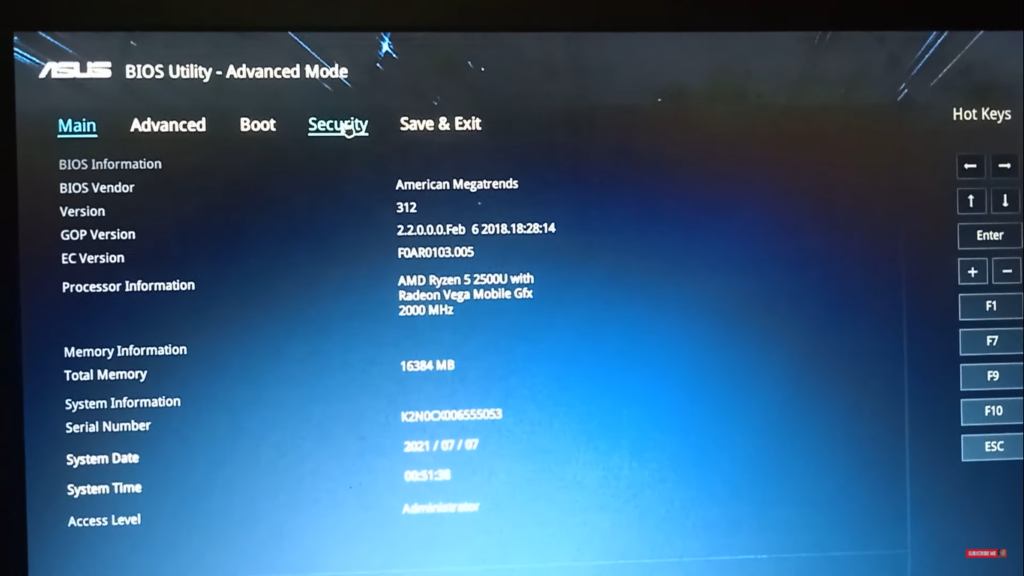
Access the “Security panel” press enter you see security boot menu select it by pressing enter.
Step 3
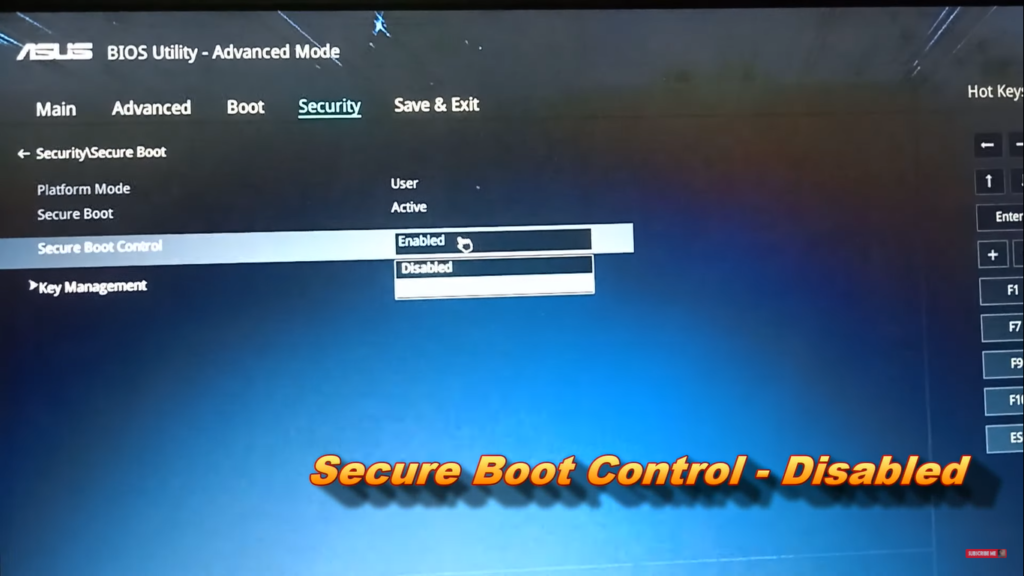
Now you see “Secure boot control” if it is enabled then disable it by pressing the same enter key. After the disk is able it go back by using the escape key.
Step 4

Now use the left key and go to the “Boot option” there will be two options first “Fast boot” and second “Launch Csm” to enable the launch CSM.
Step 5
Once CSM is enabled use the right key and “Save all changes” then go to the very top menu bar, select the option “Save & Exit” and press Enter.
After all this process, your laptop will restart again itself and now your main boot menu will not appear instead window option will appear and the logo directly.
Check Also: 7 Best Laptops for Vinyl Cutting
Access bios on Asus laptop under Windows 10 & 11
If you use Windows 11 then follow the following steps to access bios on an Asus laptop. The process is not difficult but a little bit complicated. That’s why follow step by step and don’t miss any step.
Step 1
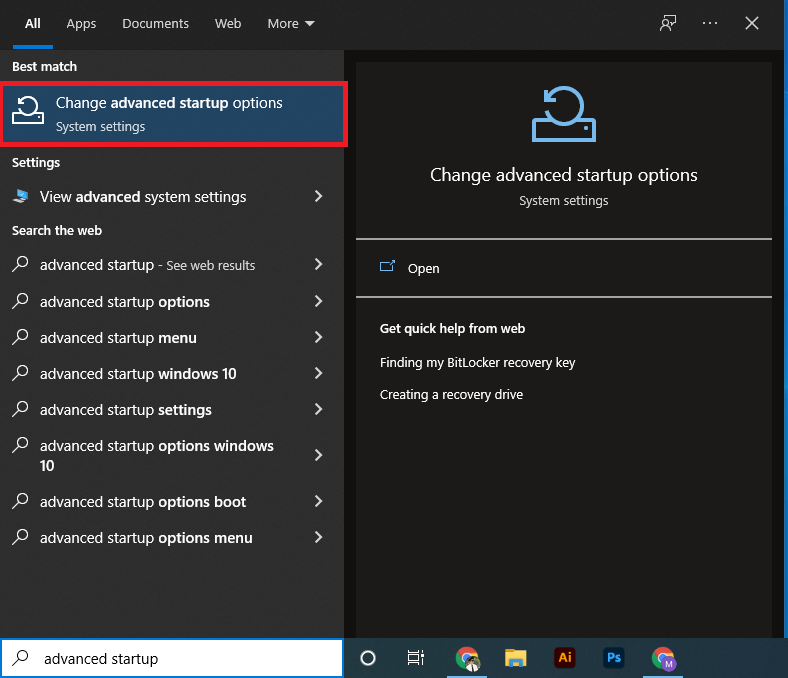
Step 2
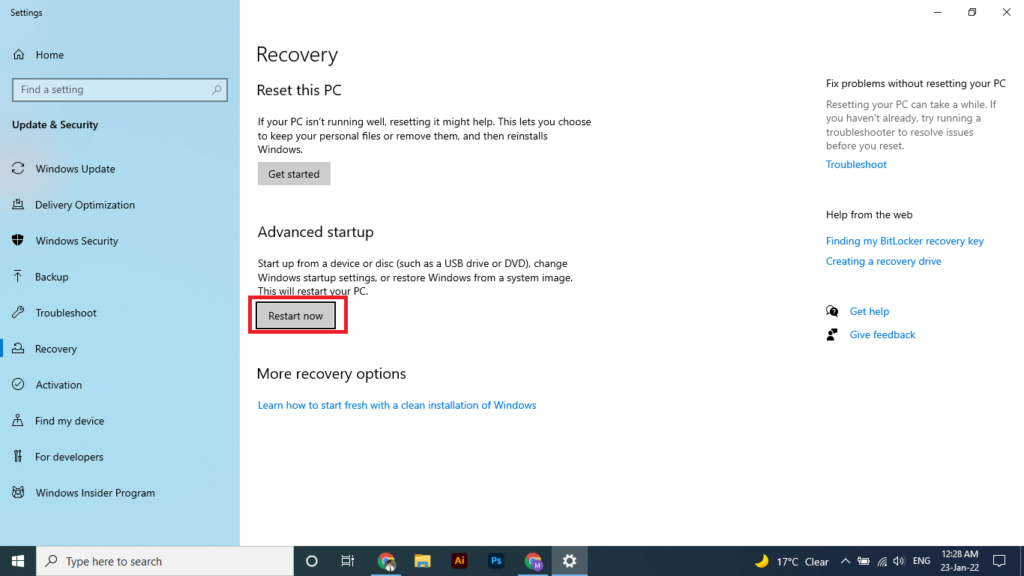
After doing this step, an option saying “Open Option” will appear. Now you see different recovery options one of them is an “Advanced startup” option. There is another option of “Restart now” click on it.
Step 3
The window will restart your system if you click on “Restart now” make sure you save your work then allow it to restart. Several tabs appear when your system restarted, select “Troubleshoot”.
Step 4
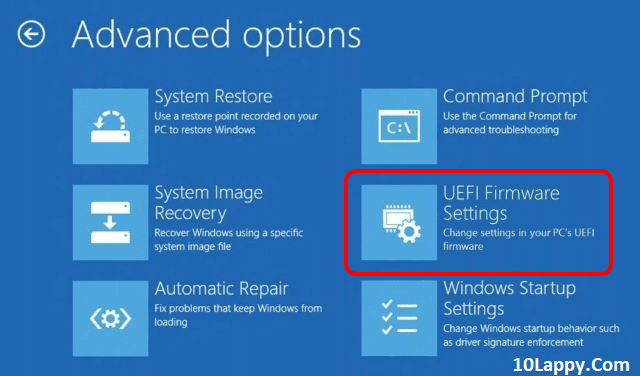
Two options will appear, first “Reset this PC” and the second one is “Advanced options”. Select the “Advanced Option” from the menu.
Step 5
Now you can see five to six different options select and click on “Uffi Firmware Setting”.
Step 6
The last step is to click on the restart and the laptop will restart to apply the changes and after the restart, BIOS will be open.
Asus laptop bios access under Windows 7
In Window 7 the process of accessing Bios is a little bit easy and time-saving.
Step 1

First of all power on the laptop. Before your laptop loads the Window press one of the following keys F1, F2, or Delete button.
Step 2
The Bios will appear or a text saying “Preparing for boot menu” will appear on the screen. If these keys do not work and Bios do not appear then press Tab and then F2 key simultaneously.
Benefits of updating BIOS
If you are thinking about why one has to update the Bios, then here are some of the benefits of updating your laptop’s Bios to the latest version.
- To fix many problems and issues which are unrecovered.
- To boost the speed of the laptop.
- You can solve several bugs by updating BIOS.
- Several new functions appear by this activity.
- New updates always bring something positive and helpful.
- An updated BIOS may add support for larger memory capacities or improve CPU socket readability.
Read Also: How to take a screenshot on a laptop?
FAQs
How to access BIOS in Asus Rog?
The method for most of the Asus laptops is the same as we discussed in this article. There are some common methods e.g pressing F2 while turning on the laptop or pressing the Delete key.
When to update your BIOS?
Visit the laptop or PC manufacturer site. If they have provided the new and latest BIOS then read the instructions. If that is compatible with your laptop, download the file and install it as we discussed in this blog post.
What is a BIOS version?
A BIOS version is the integrated firmware version of your laptop or PC. It is the control center of all our working hardware. If your BIOS is updated, you can access more advanced options.
Can you update ASUS BIOS from laptop or PC BIOS options?
Yes, the ASUS Bios update is easy to install. You just have to download the ASUS EZ-3 Bios program and the UEFI file. Launch the program and install the file through it.
Final Words
There are several ways to access and update the ASUS Bios settings. We have discussed the main methods and in-Windows methods for access too. There are some reasons to update and access the BIOS like to eliminate bugs, and hardware issues or to check the system specifications. Updated BIOS will definitely work faster than the old version. That is why keeping BIOS updated is also a necessary task to do.
